Last February I had my ugly stained carpets replaced with beautiful dark laminate flooring. I LOVE my new floors, but with the beige walls and brown furniture, the floors made my living room look really dark. I decided to repaint the walls in a blue that would match the room's accents.
Here are the before and after shots....
My mom helped me pick the color: Woodlawn Blue from Benjamin Moore. I wanted to test the color before purchasing a ton of paint, and the salesman suggested I paint this special poster board. That way I could tape it to different areas around the room and test the color in different light.
I wasn't convinced that the color was right, so I went ahead and painted part of the wall in my living room anyway. Doing so meant there was no turning back...the living room was getting a make-over!
My mom was right about the color, so I went and bought 3 gallons from Regal Paint Center in Annapolis and all my painting supplies from Odenton Ace Hardware. The staff at both stores was fantastic and offered lots of helpful advice.
When I bought my condo five years ago, I was so excited to make it my home that I didn't take the time to prep the walls before painting. (Patience is a virtue of which I have very little.) The walls had been painted white, so I didn't feel the need to prime them either. Of course, the nicks and dents and nail holes have been screaming at me ever since. I promised myself that when I repainted, I would do it right.
So here's what I did:
Day 1:
I taped a plastic drop cloth around the base boards to protect my beautiful new floors, and I removed all switch plates.
Since I planned to touch up my trim anyway, I decided not to worry about taping perfectly around the edge of my baseboards.
I also covered the switches and outlets with painter's tape.
I spackled to cover all those annoying imperfections in the walls.
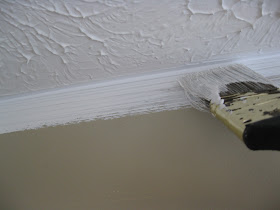
While I waited for the spackle to dry, I started to paint the edge around my ceiling using white ceiling paint. I didn't want any of the old color to be left around the edge of the ceiling.
I knew I would probably need to touch-up the ceiling again when I was finished painting. I also knew that I would be too exhausted after painting the walls to have the energy to dirty another brush.
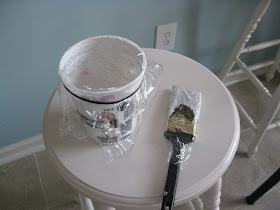
Instead of washing the brush and pouring the ceiling paint back in the can, I covered them both in plastic wrap and used an elastic hairband to keep the paint cup airtight...a little trick I learned on Pintrest. The plastic wrap worked great, my brush was still wet, even after 24 hours!
Once the spackle was totally dry, I gently sanded the areas to ensure the walls were smooth. Then I wiped away the dust with a damp sponge. Since my living room walls weren't too dirty, I didn't bother using soap. However, in high traffic areas or walls that may be covered in dirt or grease, it is recommended to use a light detergent to remove any gunk or grime.
The paint I selected had primer built in, so I only primed the areas that were covered in spackle. That way the spackling compound wouldn't absorb the paint. I learned the hard way after painting my bathroom...when you paint directly over the spackle, it's totally obvious.
The paint I selected had primer built in, so I only primed the areas that were covered in spackle. That way the spackling compound wouldn't absorb the paint. I learned the hard way after painting my bathroom...when you paint directly over the spackle, it's totally obvious.
While I was waiting for the primer to dry, I cut in around the ceiling with my Woodlawn Blue paint.
Day 2:
After a full night's rest and a few Advil to take care of some sore muscles that hadn't been used in while, I applied my first coat of paint to the walls.
It is recommended to paint one wall at a time using a V-stroke to apply and spread the paint from ceiling to floor. Having an extension for the roller is extremely helpful for reaching high on the wall toward the ceiling, but it made painting around my windows and doors a little tricky. The handle is easy enough to remove though.
Here's what the room looked like after my first coat! Even with the furniture in the middle of the floor, I could tell this was a worthy endeavor. The color is perfect, and it brightens up the room so much!
Before applying a second coat, I cut in around the baseboards, trim and ceiling. I've never had any luck with the special gadgets that allow you to paint up to an edge, so I prefer an angled paint brush for cutting in around trim and baseboards.
Once that was dry, I painted the next coat. Since the walls had been covered in a dark beige color, I made sure the second coat was applied as evenly as the first, so the old color wouldn't show through.
After the second coat was dry, I touched up the trim around my windows first, and then I touched up the ceiling. By the time I was finished with the ceiling, the windows were dry, and I could hang up my blinds.
It was pretty late at this point, so I decided to save touching up the baseboards and trim for another day. Instead I cleaned up the plastic drop cloths, washed my brushes, and gathered my supplies.
Day 3
I replaced my furniture, cleaned the floor, and hung up the mirrors and most of the pictures.
This is the view from my entryway. The natural light really makes the new color brighten the room.
Stella is very happy to see things back to normal.
I still have to hang my curtain panel over the sliding glass door. And I want to do something different with my main wall, since it's the focal point of the room. I felt like it was too cluttered before. I will surely be scanning the boards of Pintrest for inspiration, no doubt, over the next few weeks.
Before After


No comments:
Post a Comment
Questions? Comments? Just let me know!